
Air-Gapped PII Redaction for Government: A Deployment Walkthrough
Every redaction vendor selling into government says they support air-gapped deployment. Far fewer will tell you what the afternoon actually looks like. You have a room with no route to the internet, a change window, someone from security watching, and a list of artifacts that has to be complete before you walk in, because if you forget one you are not going back out for it today.
This is that list, and the order to do things in. It is written for Philter 3.4.2, the current release.
We have written before about why the architecture works offline and how self-hosted redaction maps to FedRAMP, CMMC, and ITAR. This post assumes you are past that part and have been told to go and do it.
What you are actually moving
Two container images, plus a third if you want the dashboard. There is no license server to reach, no model download on first run, and no telemetry callback to allowlist. Philter has been Apache 2.0 since version 2.6.0, so there is no key to activate. A single Philter instance does not need a database either. Its redaction policies are JSON files on disk.
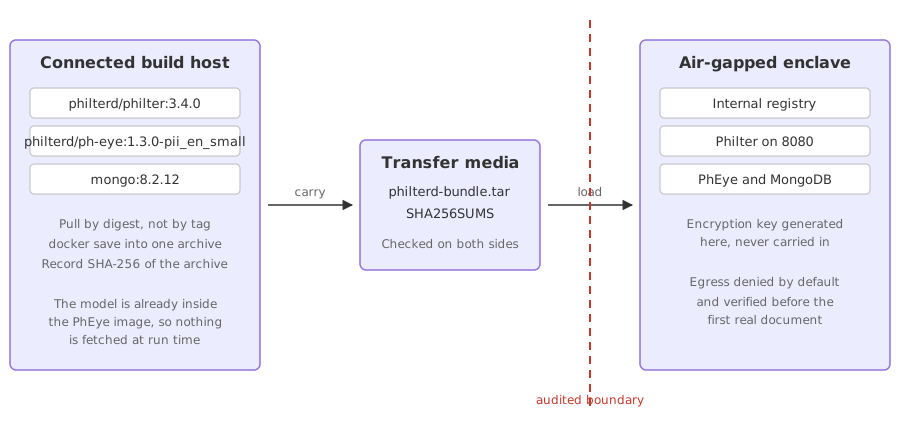
The piece that surprises people is PhEye. Its NLP model is baked into the image at build time rather than pulled at startup, and the image switches the Hugging Face libraries into offline mode. That is the difference between a service that works in a disconnected enclave and one that appears to work until the first restart. It also makes the image large, roughly 7 GB, which is worth knowing before you choose the transfer media.
Step 1: assemble the bundle outside
On a connected staging host, pull the exact versions you intend to run. There is deliberately no latest tag on philterd/philter, which is a small thing that saves you an argument with your own change control later.
docker pull philterd/philter:3.4.2
docker pull philterd/philter-ui:3.4.2
docker pull philterd/ph-eye:1.2.1
The PhEye version is not arbitrary. PhEye 1.2.1 is the version Philter 3.4.2’s own compose file is built and tested against, and its model answers to the Person label that Philter’s default policy asks for. Newer PhEye images ship different models with different label names. If you move to one later, the policy has to change with it, or names will quietly stop being found.
Pin by digest rather than by tag for anything you have to defend to an auditor. A tag is a pointer that can be moved, and a digest cannot.
docker inspect --format='{{index .RepoDigests 0}}' philterd/philter:3.4.2
Save all three into one archive and record its checksum. One archive is easier to account for on a transfer log than three.
docker save -o philterd-bundle.tar \
  philterd/philter:3.4.2 \
  philterd/philter-ui:3.4.2 \
  philterd/ph-eye:1.2.1

sha256sum philterd-bundle.tar > SHA256SUMS
The PhEye image contains exactly one model. Do not plan on choosing a different one inside the enclave with the MODEL_NAME setting: that asks for a download, and the download will not happen.
Step 2: cross the boundary
Follow whatever your program requires for media handling. The only technical advice worth giving is to verify the checksum on both sides of the transfer rather than only on the far side, so that a bad copy is distinguishable from a bad source.
sha256sum -c SHA256SUMS
Step 3: load, then push to the internal registry
docker load -i philterd-bundle.tar
Loading straight onto the host that will run the workload works for a single node and stops working the moment you have three. Retag into the internal registry and let normal deployment tooling take over.
for image in philterd/philter:3.4.2 philterd/philter-ui:3.4.2 philterd/ph-eye:1.2.1; do
  docker tag "$image" "registry.internal:5000/$image"
  docker push "registry.internal:5000/$image"
done
Step 4: take the configuration out of the images
Everything Philter needs to start is already inside its image: the settings file and a default policy. Copy them out on the inside rather than carrying them across, so the files you edit are the ones that shipped with the version you loaded.
mkdir -p policies
docker run --rm registry.internal:5000/philterd/philter:3.4.2 cat /opt/philter/philter.properties > philter.properties
docker run --rm registry.internal:5000/philterd/philter:3.4.2 cat /opt/philter/policies/default.json > policies/default.json
docker run --rm registry.internal:5000/philterd/philter-ui:3.4.2 cat /opt/philter/philter-ui.properties > philter-ui.properties
Now fix the one setting that will bite you. Philter does not find PhEye through an environment variable. It finds it through the policy, in phEyeConfiguration.endpoint, and the default policy points at http://philter-ph-eye-1:5000. That is the container name Docker Compose generates when the project directory happens to be called philter, and nowhere else. Point it at the service name instead:
sed -i 's#http://philter-ph-eye-1:5000#http://ph-eye:5000#' policies/default.json
Every policy you add later that uses PhEye needs the same endpoint.
Step 5: compose the stack with nothing that reaches out
The compose file in the Philter repository builds from source, which is useful for development and wrong here. Reference the loaded images instead, and point the registry prefix at your own.
services:
  philter:
    image: registry.internal:5000/philterd/philter:3.4.2
    depends_on:
      - ph-eye
    ports:
      - "8080:8080"
    volumes:
      - ./philter.properties:/opt/philter/philter.properties
      - ./policies/:/opt/philter/policies/

  ph-eye:
    image: registry.internal:5000/philterd/ph-eye:1.2.1

  philter-ui:
    image: registry.internal:5000/philterd/philter-ui:3.4.2
    depends_on:
      - philter
    ports:
      - "127.0.0.1:9000:9000"
    volumes:
      - ./philter-ui.properties:/opt/philter/philter-ui.properties
PhEye publishes no port. Philter reaches it over the compose network, and nothing else needs to. The dashboard’s settings file already points at http://philter:8080, which is the compose service name, so it needs no edit.
A single Philter instance uses a built-in in-memory cache and needs nothing further. If you are running several behind a load balancer, add a Redis-compatible cache to the bundle in step 1 and set cache.enabled and cache.host in philter.properties (or PHILTER_CACHE_ENABLED and PHILTER_CACHE_HOST in the environment), because the in-memory cache is not shared between instances and does not survive a restart. That cache holds sensitive values, so secure it accordingly.
Step 6: decide who can reach it
This is the step people skip, and in an enclave it matters more than anywhere else.
Philter 3.4.2’s API has no credentials of its own. Anything that can reach port 8080 can submit documents, and can read and change policies through the policies API. The dashboard has no sign-in either, and it can edit policies too. So access control is a network decision, and you should make it on purpose:
- Expose 8080 only to the systems that send documents, with a firewall rule or network policy you can show an assessor.
- Keep the dashboard bound to the host, as the compose file above does, or leave its image out of the bundle entirely. It is meant for testing configuration, not for production traffic.
- The image serves plain HTTP. Put TLS in front of it with a certificate from your internal CA, either in Philter itself (using a signed certificate with Philter) or at a reverse proxy inside the enclave (using an Apache reverse proxy with Philter).
Generate the TLS private key inside the enclave. A key created on the staging host has been outside the boundary, which is a conversation you do not want to have during an assessment.
Step 7: first start and a smoke test
docker compose up -d
curl http://localhost:8080/api/status
The status endpoint returns healthy followed by the Philter version, so it tells you what you are running as well as whether it is up. That is the line you want in the change record.
PhEye loads its model at startup, so give it a minute before the next call. Then send one document you already know the answer for. Not a real record, and not a synthetic one so clean that it proves nothing.
curl -X POST "http://localhost:8080/api/filter?p=default" \
  -H "Content-Type: text/plain" \
  -d "George Washington lives in 90210 and his SSN was 123-45-6789."
There are two failures to expect here, and they look different. If the call returns an error instead of text, Philter could not reach PhEye. Either the model is still loading or the endpoint in the policy from step 4 is wrong, and Philter’s log will say which. The quieter failure is a successful response where the zip code and SSN are redacted and the name is not. That means PhEye answered but found nothing for the label the policy asked for, which is what a policy and PhEye image that do not match look like.
If you kept the dashboard, open http://localhost:9000 on the host and run the same text through it. It is the quickest way to try a policy change before you commit it to the file.
Step 8: prove the gap, do not assume it
The deployment has no outbound dependency, but the useful artifact for an assessor is evidence rather than an assurance from a vendor. Deny egress at the network policy and confirm the stack still comes up clean from a cold start.
docker compose down
docker compose up -d
A restart is the honest test. Anything that was quietly fetched during the first run and cached will fail here rather than in six months when a node is replaced.
Step 9: plan the upgrade before you need it
Upgrades are step 1 through step 3 again, which is worth saying out loud during the initial deployment while everyone is in the room. Keep the previous archive until the new version has run in the enclave for a while, because rolling back is another boundary crossing if you have deleted it. Re-check the PhEye endpoint and labels in your policies whenever either image changes.
What to hand the auditor
By the end you have a version-pinned bill of materials with digests, a checksum record for the transfer, a TLS key that has never existed outside the boundary, a documented rule for who can reach the API, and a cold-start test taken with egress denied. That set answers most of what a control review asks about a redaction component, and it is considerably easier to assemble on the day than to reconstruct afterwards.
Detection is probabilistic, so the other half of the work is measuring how the policy performs against your own documents. That is a separate exercise from the deployment, and one worth scheduling before the system carries anything that matters.