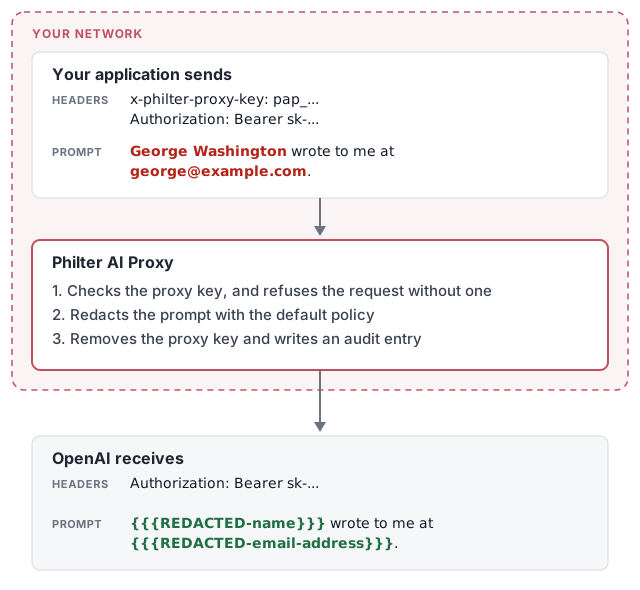
Philter AI Proxy sits between your application and its LLM provider. It redacts the PII and
PHI it detects in each prompt before the request leaves your network, then forwards it with
your application’s own provider credential. This page takes you from docker run to a
redacted prompt, first with curl and then from the OpenAI Python SDK.
1. Start the proxy
Generate the two keys the proxy needs and start it. Keep a copy of the encryption key, because the proxy’s database cannot be read without it and the proxy refuses to start with a different one.
export ENCRYPTION_KEY="$(openssl rand -hex 32)"
export BOOTSTRAP_API_KEY="$(openssl rand -hex 32)"

docker run -d --name philter-ai-proxy \
  -p 8080:8080 -p 127.0.0.1:9090:9090 \
  -v philter-ai-proxy-data:/var/lib/philter-ai-proxy \
  -e PHILTER_AI_PROXY_ENCRYPTION_KEY="$ENCRYPTION_KEY" \
  -e PHILTER_AI_PROXY_BOOTSTRAP_API_KEY="$BOOTSTRAP_API_KEY" \
  philterd/philter-ai-proxy:1.0.0
PHILTER_AI_PROXY_ENCRYPTION_KEYencrypts the policies and replacements the proxy stores in its SQLite database, which lives in thephilter-ai-proxy-datavolume.PHILTER_AI_PROXY_BOOTSTRAP_API_KEYbecomes an admin key the first time the proxy starts. You use it once, in the next step, to create a key for your application.- Port
8080takes provider traffic and the admin API. Port9090serves Prometheus metrics without authentication, so the command publishes it on your machine’s loopback address only.
The image includes the model the default policy uses to find person names, so nothing else needs to run beside it. Wait until the model has loaded, which took about ten seconds when we tested this page.
curl -k https://localhost:8080/readyz
{"status":"ok"}
The proxy serves HTTPS with a self-signed certificate it generates when it starts, which is
why curl needs -k here.
2. Create a key for your application
Applications authenticate to the proxy with a proxy key, separate from their provider credential. Create one with the bootstrap key.
curl -k https://localhost:8080/admin/api/keys \
  -H "Authorization: Bearer $BOOTSTRAP_API_KEY" \
  -H "Content-Type: application/json" \
  -d '{"name": "my-app", "roles": ["proxy"]}'
{"roles":["proxy"],"providers":[],"models":[],"paths":[],"id":"...","name":"my-app","createdAt":"...","key":"pap_..."}
The key is shown only once, so copy it now. A key can also be limited to certain providers,
models, paths, or a policy, as described under
API keys.
export PROXY_KEY="pap_..."
3. Send a prompt through it
Send the request you would send to OpenAI, to the proxy instead. Your OpenAI key goes in
Authorization as usual, and the proxy key goes in x-philter-proxy-key.
curl -k https://localhost:8080/v1/chat/completions \
  -H "x-philter-proxy-key: $PROXY_KEY" \
  -H "Authorization: Bearer $OPENAI_API_KEY" \
  -H "Content-Type: application/json" \
  -d '{"model": "gpt-4o-mini", "messages": [{"role": "user", "content": "George Washington wrote to me at george@example.com."}]}'
OpenAI receives the prompt below, with your OpenAI key and without the proxy key. The default policy finds person names, SSNs, and email addresses.
{{{REDACTED-name}}} wrote to me at {{{REDACTED-email-address}}}.
A request without a valid proxy key is refused with 401 and never reaches the provider.
4. Use it from the OpenAI SDK
In code, the change is the client’s base URL and one header. The SDK verifies certificates, so first save the proxy’s self-signed certificate and tell Python to trust it. The proxy generates a new certificate each time it restarts, so save it again after a restart.
openssl s_client -connect localhost:8080 </dev/null 2>/dev/null \
  | openssl x509 > philter-ai-proxy.pem
export SSL_CERT_FILE="$PWD/philter-ai-proxy.pem"

pip install openai
import os
from openai import OpenAI

client = OpenAI(
    api_key=os.environ["OPENAI_API_KEY"],
    base_url="https://localhost:8080/v1",
    default_headers={"x-philter-proxy-key": os.environ["PROXY_KEY"]},
)

response = client.chat.completions.create(
    model="gpt-4o-mini",
    messages=[{"role": "user", "content": "George Washington wrote to me at george@example.com."}],
)
print(response.choices[0].message.content)
OpenAI receives the same redacted prompt as in step 3, and the model answers what it was sent. The proxy also handles Anthropic, Gemini, Vertex AI, Amazon Bedrock, Azure OpenAI, Ollama, and OpenAI-compatible servers such as vLLM, each at its own path. See Usage for each provider.
Before production
- Replace the self-signed certificate with your own, or serve plain HTTP behind a load balancer that terminates TLS. See Certificates.
- Back up the
philter-ai-proxy-datavolume, and keep the encryption key with the backups. Policies, API keys, and the audit log are all stored there. - Keep port
9090off the internet, since the metrics endpoint has no authentication. - Responses are not scanned unless you turn it on for a route. See Response Scanning.
- Write a policy for the PII in your own prompts. See Policies.
Detection is probabilistic, so the proxy reduces how much PII reaches your provider rather than stopping all of it. Validate its output against your own prompts before relying on it.
How the proxy works
Policies
The request above used the proxy’s built-in default policy, which redacts person names,
SSNs, and email addresses. Policies are the same JSON that Philter and Phileas use, so a policy
written for Philter works here unless it calls an outside service. Create one with
POST /admin/api/policies?name=... using the bootstrap key.
Which policy applies
A key created with a policy uses that policy for every request it makes. Otherwise the first
matching route decides, and when no route matches, default applies. See
choosing the policy.
Responses
Provider responses come back unchanged by default. Turn on response scanning for a route to redact what the model sends back, streamed responses included.
Images and files
A request carrying images, audio, video, or files is refused with 400, because the proxy
cannot redact them. You can configure it to forward them unredacted instead.
The audit log
Every request produces one JSON audit entry with the provider, model, key ID, and a count of what was found by type. Entries go to the proxy’s database and to standard output, and they never contain the text of a prompt or response.
Where to go next
 Policy libraryReady-made redaction policies to start from
 Proxy documentationConfiguration, providers, and the admin API
 Use with an AI gatewayRun it beside LiteLLM, Portkey, or Kong